Kit Contents
Kits contain 0.4% Trypan Blue in PBS. The Trypan Blue reagent should be stored at room temperature (15 – 30°C) in an airtight container and does not need to be protected from light.
| Assay Size | Trypan Original Concentration | Number of Tests |
|---|---|---|
| 0.25 mL | 0.4% | 50 |
| 0.2% | 100 | |
| 1.5 mL | 0.4% | 300 |
| 0.2% | 600 |
Sample Volume and Chamber Height
The required sample volume for the CellDrop depends on the height of the measurement chamber, which is set in the counting protocol.
Standard Magnification (FLi & BF)
| Gap Height (um) | Volume (uL) | Minimum Density (cells/mL) | Maximum Density (cells/mL) |
|---|---|---|---|
| 400 | 40 | 7.0E+02 | 3.1E+06 |
| 100 | 10 | 2.9E+03 | 1.3E+07 |
| 50 | 5 | 5.9E+03 | 2.5E+07 |
| Gap Height (um) | Volume (uL) | Minimum Density (cells/mL) | Maximum Density (cells/mL) |
|---|---|---|---|
| 400 | 40 | 4.3E+03 | 2.6E+07 |
| 100 | 10 | 1.7E+04 | 1.0E+08 |
| 50 | 5 | 3.4E+04 | 2.1E+08 |
Best Practices
- Ensure that the upper and lower chamber surfaces are clean prior to loading sample.
- Lower the arm prior to dispensing sample into the measurement chamber.
- Spin down or filter Trypan Blue dye through a 0.2 μm filter to remove crystallized trypan.
- Mix cells immediately before loading sample and avoid introducing air bubbles.
- Once cells are mixed with trypan blue measure within 5 minutes.
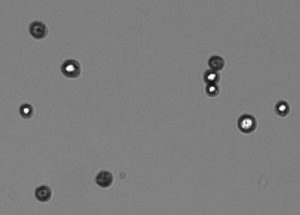
- Follow the image guides to adjust focus and exposure so that unstained cells have bright white centers with a sharp black ring and a sharp transition from light to dark, as shown in Figure 1.
- Allow cells to settle and stop moving across the live preview before pressing the Count button.
- Optimize protocol settings for different cell types. The Default Protocol is a good starting point.

Sample Prep
- Mix cell suspension and Trypan Blue immediately prior to use.
- Optional: Filter Trypan solution through a 0.2 µm filter to remove aggregates and crystals that can form in Trypan solution over time.
- For each sample, mix Trypan and a cell suspension together at the desired ratio and vortex. Refer to the table below for Dilution Factor (DF) guidance examples.
| Trypan Volume | Cell Volume | Protocol Dilution Factor | Recommended Exposure |
|---|---|---|---|
| 5 µL 0.4% | 5 µL | 2 | Normal |
| 2.5 µL 0.4% | 7.5 µL | 1.33 | Low |
Sample Measurement
- With the CellDrop arm in the down position, launch one of the Trypan Blue apps.
- Set sample name, information and protocol as appropriate. If mixing cells and trypan in a ratio other than 1:1, edit the Dilution Factor in the protocol.
- Pipette well-mixed cells + Trypan Blue solution and dispense appropriate sample volume into the measurement chamber, using the groove on the lower sample surface as a pipetting guide.
- Note: The volume of sample required depends on the protocol settings for the chamber height. The required volume is displayed on the Count button.
- Adjust exposure and focus according to the image guide.
- Allow cells to settle, then press the Count button.
Refer to Technical Note 186 – CellDrop Best Practices for additional guidance.
Refer to denovix.com/sds for safety data sheets for CellDrop Cell Counting Assays.
9-OCT-2024


